

-
Thanks for visiting the Kaleidescape Owners' Forum
This forum is for the community of Kaleidescape owners, and others interested in learning about the system, equipment, services, and the company itself.It is run by a group of enthusiastic Kaleidescape owners and dealers purely as a service to this community.
This board is not affiliated in any way with Kaleidescape, Inc.
For official technical support, product information, or customer service, please visit www.kaleidescape.com
You can dismiss this box forever by clicking the "X" in the upper right corner of this message. -
You are currently in "Guest" mode and not logged in with a registered account.
The forum is free to use and most of the forum can be used by guests who are not registered....
... but we strongly encourage you to register for a full account. There is no cost to register for a full account.
Benefits of registering for a full account:
- Participate in the discussions! You must have a registered account to make posts on the forums. You will be able to start your own thread on a topic or question, or you can reply to other threads/discussions.
- Use the "Conversation" feature (known as "private messaging" on other forums) to communicate directly with any of the other users here.
- Access the Files area. The "resources" area of the forum contains many "Favorite Scene" and Script files that can dramatically increase the enjoyment of your Kaleidescape system. Go directly to great scenes in your favorite movies, created by other owners, and add automation to playback of your system with Scripts.
- You won't see this annoying notice at the top of every screen!😊
This box goes away for registered users.
You are using an out of date browser. It may not display this or other websites correctly.
You should upgrade or use an alternative browser.
You should upgrade or use an alternative browser.
190" MicroLED Wall Build
- Thread starter madolfsson
- Start date
Yes, the Novastar MX2000 Pro and input and output cards all support 4:4:4 through the entire signal chain.Can it display the 4:4:4 from the new Kaleidescape Strato K?
@madolfsson
Wonderfully documented! Thank you for sharing!
I was wondering, if you thought about buying spare whole panels as well. At my workplace, we have some sort of similar video wall screen systems that are used as digital set pieces. I remember, when I was on a tour of the studio, that they kept a number of hot spares running so that they could swap in a panel that would have matching characteristics as the other panels that had been running for X number of hours.
I don’t know enough to know if this was simply because they need to have a fast replacement that is easy, but was wondering why you didn’t seem to have any spare units prepurchased in case of any sort of failure.
Having spare units running along side the active ones means the you can swap a failed panel without worrying about calibrating a new one to match the ones that have been running. During your research, did you find out how this is handled in commercial systems and decide not to go for full spares?
Cheers and take care,
-Jonathon
Wonderfully documented! Thank you for sharing!
I was wondering, if you thought about buying spare whole panels as well. At my workplace, we have some sort of similar video wall screen systems that are used as digital set pieces. I remember, when I was on a tour of the studio, that they kept a number of hot spares running so that they could swap in a panel that would have matching characteristics as the other panels that had been running for X number of hours.
I don’t know enough to know if this was simply because they need to have a fast replacement that is easy, but was wondering why you didn’t seem to have any spare units prepurchased in case of any sort of failure.
Having spare units running along side the active ones means the you can swap a failed panel without worrying about calibrating a new one to match the ones that have been running. During your research, did you find out how this is handled in commercial systems and decide not to go for full spares?
Cheers and take care,
-Jonathon

madolfsson
Active member
Thanks for the great feedback.
The system did come with quite a few spare parts, although not complete cabinet panels.
- 12 spare "panels"
- 2 spare cabinet "mother boards"
- 3 spare power adapters
- 3 spare receiving cards
We will see if that is enough... If enough fails at the some point in the distance future I could just scale down the screen to 7 wide 6 tall cinemascope style and have 7 spare cabinets of parts.
The system did come with quite a few spare parts, although not complete cabinet panels.
- 12 spare "panels"
- 2 spare cabinet "mother boards"
- 3 spare power adapters
- 3 spare receiving cards
We will see if that is enough... If enough fails at the some point in the distance future I could just scale down the screen to 7 wide 6 tall cinemascope style and have 7 spare cabinets of parts.

I believe the spares will look different than the ones you had in operation. Just using the factory calibration data will not be sufficient.
madolfsson
Active member
I damaged five tiles during installation and used spares in those locations. After syncing the calibration data they are indistinguishable from the surrounding panels. I don't quite understand the calibration process - I think the data is stored in flash on the receiver card but also has to be read into the MX2000 Pro.I believe the spares will look different than the ones you had in operation. Just using the factory calibration data will not be sufficient.
madolfsson
Active member
Not at the moment, waiting for some more reviews to come in. I personally believe that for regular watching 4:2:0 vs 4:2:2 is very hard to tell apart.Are you planning on getting a Strato K and documenting the experience on this wall?
Yes, brand new. But over time, the spare tiles will look different than the ones that have been in operation for years.I damaged five tiles during installation and used spares in those locations. After syncing the calibration data they are indistinguishable from the surrounding panels. I don't quite understand the calibration process - I think the data is stored in flash on the receiver card but also has to be read into the MX2000 Pro.
Nothing that can´t be solved with re-calibration, but it won´t be as easy than just replacing them.
madolfsson
Active member
HDR UPDATE: ADDING THE madVR ENVY CORE
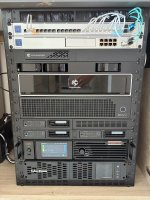
In my original post, I spent a lot of time explaining how to make HDR look the way I wanted on this wall. The NovaStar accepts HDR10 and HLG, handles the PQ signal correctly, and gives you several controls for shaping how that signal is mapped to the wall. But by default, the HDR picture is too dark for daytime viewing.
My original workaround was to use ST2086 linear mapping and manually lower the MaxCLL value. On a wall calibrated to roughly 1070 nits, telling the NovaStar that the source peak was something like 300 nits effectively scaled the image upward and gave me the punch I was looking for. It worked surprisingly well, but the tradeoff was exactly what I described in the original post: the lower I pushed MaxCLL, the brighter the overall image became, but the more highlight information I sacrificed above that point. In other words, brightness and clipping were tied together.
That was always the compromise.
The NovaStar also has additional tools that I didn’t explore deeply enough at the time, including Clip Level and Shadow Compensation. Clip Level in particular can soften the transition near the top of the PQ range rather than simply hard-clipping it, so I probably could have gotten somewhat more sophisticated results than my original MaxCLL-only approach.
But all of those controls still share the same fundamental limitation: they’re static.
You choose a curve and a set of values, and those settings are applied to everything. The controller isn’t looking at the actual content and changing its mapping from scene to scene. That’s where the Envy changes things.
The chain is now:
Sources -> HDFury VRROOM -> madVR Envy Core -> NovaStar MX2000 Pro -> LED wall
The Envy now receives the HDR signal, performs the tone mapping, and outputs SDR to the NovaStar. Instead of me choosing one MaxCLL compromise that has to work for an entire movie, the Envy analyzes the actual video as it plays and continuously adjusts the mapping to fit the display target. With my old NovaStar-only approach, I was effectively saying:
“Make everything brighter by this amount, and I’m willing to lose whatever falls above this point.”
With the Envy, I’m instead telling the processor what kind of display target I want, and it dynamically works out how to fit each scene into it. A scene with very bright highlights can be compressed differently from a dark interior scene. I no longer have to choose one static point that inevitably works better for some scenes than others.
It also solves one of the biggest annoyances I mentioned in the original post: HDR10 no longer needs its own per-title MaxCLL adjustment. Previously I had presets like 100, 200, 300, 400, 500 and Off because different HDR10 titles could respond very differently to the same override. One movie would look great at 300, another would clip badly, and another might still look too dim. That’s gone.
The Envy analyzes the picture itself rather than depending on me to pick a static override based on the title’s metadata.
The same applies to my LLDV setup. Previously the HDFury could have the source perform dynamic Dolby Vision tone mapping first, but I was then applying my own static brightness boost at the NovaStar afterward. That got me the brightness I wanted, but it also partially defeated the point of the upstream dynamic mapping because I could still clip the result with my MaxCLL override.
The Envy replaces that two-stage compromise with one dynamic mapping process. Instead of choosing between midtone brightness and highlight preservation with one static setting, I can now push the overall presentation toward the brighter look I prefer while letting the processor continuously decide how to handle the actual highlight information in each scene.
That distinction becomes especially important because of what I did next with automatic brightness.
PSEUDO Dolby Vision IQ or HDR10+ Adaptive AUTOMATIC BRIGHTNESS
Once the Envy was in place, I realized I could finally automate brightness in a way that made sense for both HDR and SDR. There are two separate brightness controls in the system, and they do very different jobs.
For HDR, the main control is hdrNits on the Envy. This is the tone-mapping target, and in my setup lower values produce a brighter, punchier image. Around 1000 nits is my reference setting; around 100 nits is much brighter for daytime viewing.
For SDR, hdrNits does nothing, so the only meaningful control is the actual LED drive level on the NovaStar, which I can change dynamically over Art-Net.
That gave me enough control to build an automatic mode based on room brightness.
An Aqara FP2 in the room reports ambient light in lux to Home Assistant. I run that through a 10-minute rolling average, then map the result to an Envy hdrNits target using a simple piecewise-linear curve:
0 lux = 1000 hdrNits
10 lux = 1000 hdrNits
50 lux = 700 hdrNits
150 lux = 400 hdrNits
300 lux = 180 hdrNits
500+ lux = 100 hdrNits
So in a dark room, the Envy stays close to my reference setting. As the room gets brighter, the hdrNits target drops and the HDR image becomes progressively brighter to compensate for the ambient light. Everything between those points is interpolated and then rounded to 25-nit steps. Dampening logic ensures changes are smooth.
There is a separate rule for SDR. Since the Envy’s hdrNits setting has no effect on SDR, SDR content in a dim room drops the NovaStar LED drive to 50%. HDR content, or SDR viewed in brighter ambient light, runs the wall at 100%.
The result is that I basically stopped touching the brightness control. At night, the wall gradually settles back toward my reference HDR setting and lower SDR LED output. During the day, opening the blinds causes the system to progressively increase the perceived brightness so the image still holds up against the room.
Conceptually it is similar to what Dolby Vision IQ or HDR10+ Adaptive does on a television, except the ambient-light logic is running in Home Assistant, the tone mapper is external, and I control the curve myself.
THE NEW REMOTE

The other big change is the remote. I’m now using a Sanytron Astrion HA100, a small Android-based touchscreen remote that integrates with Home Assistant.
I liked the hardware, but the stock software was too limiting for what I wanted to do. The interface was restricted to a fixed set of card types, and the physical buttons were particularly frustrating: they could either behave as global navigation controls or perform page-specific actions, but not both. So I replaced the stock remote software with a Kotlin/Compose app. It’s open source here:
github.com/marcusadolfsson/astrion-custom
The home screen gives me direct access to the things I use most: activity selection, the Dim / Normal / Bright / Auto brightness modes described above, shades, climate, and the rest of the room controls. The VOICE button is probably my favorite part. Holding it streams audio from the remote’s microphone to Home Assistant, which decides where to send it based on the current activity.
For Apple TV, the audio is routed to Siri, so the remote effectively regains the Siri functionality I lost when I stopped using the Apple TV remote.
For Kaleidescape, the same button becomes a voice movie search. I can say the name of a movie, ask for movies by a particular director, or even describe a movie I can’t remember the name of. Home Assistant searches my actual Kaleidescape library and can start the matching title.
Being able to say something like “the one where the president fights terrorists on a plane” and have Air Force One start playing is probably my favorite trick in the house.
I also added a volume/mute OSD directly to the remote. Pressing a volume button gives immediate visual feedback in your hand rather than requiring an overlay on a 190-inch screen.
The end result is that the Astrion hardware is basically just the front end now. Home Assistant provides the state and configuration, while the custom app handles the UI, physical buttons, microphone, and feedback. That gives me one remote that can control the entire room without requiring anyone using it to know what’s happening behind the scenes.
In my original post, I spent a lot of time explaining how to make HDR look the way I wanted on this wall. The NovaStar accepts HDR10 and HLG, handles the PQ signal correctly, and gives you several controls for shaping how that signal is mapped to the wall. But by default, the HDR picture is too dark for daytime viewing.
My original workaround was to use ST2086 linear mapping and manually lower the MaxCLL value. On a wall calibrated to roughly 1070 nits, telling the NovaStar that the source peak was something like 300 nits effectively scaled the image upward and gave me the punch I was looking for. It worked surprisingly well, but the tradeoff was exactly what I described in the original post: the lower I pushed MaxCLL, the brighter the overall image became, but the more highlight information I sacrificed above that point. In other words, brightness and clipping were tied together.
That was always the compromise.
The NovaStar also has additional tools that I didn’t explore deeply enough at the time, including Clip Level and Shadow Compensation. Clip Level in particular can soften the transition near the top of the PQ range rather than simply hard-clipping it, so I probably could have gotten somewhat more sophisticated results than my original MaxCLL-only approach.
But all of those controls still share the same fundamental limitation: they’re static.
You choose a curve and a set of values, and those settings are applied to everything. The controller isn’t looking at the actual content and changing its mapping from scene to scene. That’s where the Envy changes things.
The chain is now:
Sources -> HDFury VRROOM -> madVR Envy Core -> NovaStar MX2000 Pro -> LED wall
The Envy now receives the HDR signal, performs the tone mapping, and outputs SDR to the NovaStar. Instead of me choosing one MaxCLL compromise that has to work for an entire movie, the Envy analyzes the actual video as it plays and continuously adjusts the mapping to fit the display target. With my old NovaStar-only approach, I was effectively saying:
“Make everything brighter by this amount, and I’m willing to lose whatever falls above this point.”
With the Envy, I’m instead telling the processor what kind of display target I want, and it dynamically works out how to fit each scene into it. A scene with very bright highlights can be compressed differently from a dark interior scene. I no longer have to choose one static point that inevitably works better for some scenes than others.
It also solves one of the biggest annoyances I mentioned in the original post: HDR10 no longer needs its own per-title MaxCLL adjustment. Previously I had presets like 100, 200, 300, 400, 500 and Off because different HDR10 titles could respond very differently to the same override. One movie would look great at 300, another would clip badly, and another might still look too dim. That’s gone.
The Envy analyzes the picture itself rather than depending on me to pick a static override based on the title’s metadata.
The same applies to my LLDV setup. Previously the HDFury could have the source perform dynamic Dolby Vision tone mapping first, but I was then applying my own static brightness boost at the NovaStar afterward. That got me the brightness I wanted, but it also partially defeated the point of the upstream dynamic mapping because I could still clip the result with my MaxCLL override.
The Envy replaces that two-stage compromise with one dynamic mapping process. Instead of choosing between midtone brightness and highlight preservation with one static setting, I can now push the overall presentation toward the brighter look I prefer while letting the processor continuously decide how to handle the actual highlight information in each scene.
That distinction becomes especially important because of what I did next with automatic brightness.
PSEUDO Dolby Vision IQ or HDR10+ Adaptive AUTOMATIC BRIGHTNESS
Once the Envy was in place, I realized I could finally automate brightness in a way that made sense for both HDR and SDR. There are two separate brightness controls in the system, and they do very different jobs.
For HDR, the main control is hdrNits on the Envy. This is the tone-mapping target, and in my setup lower values produce a brighter, punchier image. Around 1000 nits is my reference setting; around 100 nits is much brighter for daytime viewing.
For SDR, hdrNits does nothing, so the only meaningful control is the actual LED drive level on the NovaStar, which I can change dynamically over Art-Net.
That gave me enough control to build an automatic mode based on room brightness.
An Aqara FP2 in the room reports ambient light in lux to Home Assistant. I run that through a 10-minute rolling average, then map the result to an Envy hdrNits target using a simple piecewise-linear curve:
0 lux = 1000 hdrNits
10 lux = 1000 hdrNits
50 lux = 700 hdrNits
150 lux = 400 hdrNits
300 lux = 180 hdrNits
500+ lux = 100 hdrNits
So in a dark room, the Envy stays close to my reference setting. As the room gets brighter, the hdrNits target drops and the HDR image becomes progressively brighter to compensate for the ambient light. Everything between those points is interpolated and then rounded to 25-nit steps. Dampening logic ensures changes are smooth.
There is a separate rule for SDR. Since the Envy’s hdrNits setting has no effect on SDR, SDR content in a dim room drops the NovaStar LED drive to 50%. HDR content, or SDR viewed in brighter ambient light, runs the wall at 100%.
The result is that I basically stopped touching the brightness control. At night, the wall gradually settles back toward my reference HDR setting and lower SDR LED output. During the day, opening the blinds causes the system to progressively increase the perceived brightness so the image still holds up against the room.
Conceptually it is similar to what Dolby Vision IQ or HDR10+ Adaptive does on a television, except the ambient-light logic is running in Home Assistant, the tone mapper is external, and I control the curve myself.
THE NEW REMOTE
The other big change is the remote. I’m now using a Sanytron Astrion HA100, a small Android-based touchscreen remote that integrates with Home Assistant.
I liked the hardware, but the stock software was too limiting for what I wanted to do. The interface was restricted to a fixed set of card types, and the physical buttons were particularly frustrating: they could either behave as global navigation controls or perform page-specific actions, but not both. So I replaced the stock remote software with a Kotlin/Compose app. It’s open source here:
github.com/marcusadolfsson/astrion-custom
The home screen gives me direct access to the things I use most: activity selection, the Dim / Normal / Bright / Auto brightness modes described above, shades, climate, and the rest of the room controls. The VOICE button is probably my favorite part. Holding it streams audio from the remote’s microphone to Home Assistant, which decides where to send it based on the current activity.
For Apple TV, the audio is routed to Siri, so the remote effectively regains the Siri functionality I lost when I stopped using the Apple TV remote.
For Kaleidescape, the same button becomes a voice movie search. I can say the name of a movie, ask for movies by a particular director, or even describe a movie I can’t remember the name of. Home Assistant searches my actual Kaleidescape library and can start the matching title.
Being able to say something like “the one where the president fights terrorists on a plane” and have Air Force One start playing is probably my favorite trick in the house.
I also added a volume/mute OSD directly to the remote. Pressing a volume button gives immediate visual feedback in your hand rather than requiring an overlay on a 190-inch screen.
The end result is that the Astrion hardware is basically just the front end now. Home Assistant provides the state and configuration, while the custom app handles the UI, physical buttons, microphone, and feedback. That gives me one remote that can control the entire room without requiring anyone using it to know what’s happening behind the scenes.
J.Chitwood
Well-known member
When I grow up I want to be just like @madolfsson. For real, I love these updates and I am enamored with your work and setup.
HDR UPDATE: ADDING THE madVR ENVY CORE
View attachment 11294
In my original post, I spent a lot of time explaining how to make HDR look the way I wanted on this wall. The NovaStar accepts HDR10 and HLG, handles the PQ signal correctly, and gives you several controls for shaping how that signal is mapped to the wall. But by default, the HDR picture is too dark for daytime viewing.
My original workaround was to use ST2086 linear mapping and manually lower the MaxCLL value. On a wall calibrated to roughly 1070 nits, telling the NovaStar that the source peak was something like 300 nits effectively scaled the image upward and gave me the punch I was looking for. It worked surprisingly well, but the tradeoff was exactly what I described in the original post: the lower I pushed MaxCLL, the brighter the overall image became, but the more highlight information I sacrificed above that point. In other words, brightness and clipping were tied together.
That was always the compromise.
The NovaStar also has additional tools that I didn’t explore deeply enough at the time, including Clip Level and Shadow Compensation. Clip Level in particular can soften the transition near the top of the PQ range rather than simply hard-clipping it, so I probably could have gotten somewhat more sophisticated results than my original MaxCLL-only approach.
But all of those controls still share the same fundamental limitation: they’re static.
You choose a curve and a set of values, and those settings are applied to everything. The controller isn’t looking at the actual content and changing its mapping from scene to scene. That’s where the Envy changes things.
The chain is now:
Sources -> HDFury VRROOM -> madVR Envy Core -> NovaStar MX2000 Pro -> LED wall
The Envy now receives the HDR signal, performs the tone mapping, and outputs SDR to the NovaStar. Instead of me choosing one MaxCLL compromise that has to work for an entire movie, the Envy analyzes the actual video as it plays and continuously adjusts the mapping to fit the display target. With my old NovaStar-only approach, I was effectively saying:
“Make everything brighter by this amount, and I’m willing to lose whatever falls above this point.”
With the Envy, I’m instead telling the processor what kind of display target I want, and it dynamically works out how to fit each scene into it. A scene with very bright highlights can be compressed differently from a dark interior scene. I no longer have to choose one static point that inevitably works better for some scenes than others.
It also solves one of the biggest annoyances I mentioned in the original post: HDR10 no longer needs its own per-title MaxCLL adjustment. Previously I had presets like 100, 200, 300, 400, 500 and Off because different HDR10 titles could respond very differently to the same override. One movie would look great at 300, another would clip badly, and another might still look too dim. That’s gone.
The Envy analyzes the picture itself rather than depending on me to pick a static override based on the title’s metadata.
The same applies to my LLDV setup. Previously the HDFury could have the source perform dynamic Dolby Vision tone mapping first, but I was then applying my own static brightness boost at the NovaStar afterward. That got me the brightness I wanted, but it also partially defeated the point of the upstream dynamic mapping because I could still clip the result with my MaxCLL override.
The Envy replaces that two-stage compromise with one dynamic mapping process. Instead of choosing between midtone brightness and highlight preservation with one static setting, I can now push the overall presentation toward the brighter look I prefer while letting the processor continuously decide how to handle the actual highlight information in each scene.
That distinction becomes especially important because of what I did next with automatic brightness.
PSEUDO Dolby Vision IQ or HDR10+ Adaptive AUTOMATIC BRIGHTNESS
Once the Envy was in place, I realized I could finally automate brightness in a way that made sense for both HDR and SDR. There are two separate brightness controls in the system, and they do very different jobs.
For HDR, the main control is hdrNits on the Envy. This is the tone-mapping target, and in my setup lower values produce a brighter, punchier image. Around 1000 nits is my reference setting; around 100 nits is much brighter for daytime viewing.
For SDR, hdrNits does nothing, so the only meaningful control is the actual LED drive level on the NovaStar, which I can change dynamically over Art-Net.
That gave me enough control to build an automatic mode based on room brightness.
An Aqara FP2 in the room reports ambient light in lux to Home Assistant. I run that through a 10-minute rolling average, then map the result to an Envy hdrNits target using a simple piecewise-linear curve:
0 lux = 1000 hdrNits
10 lux = 1000 hdrNits
50 lux = 700 hdrNits
150 lux = 400 hdrNits
300 lux = 180 hdrNits
500+ lux = 100 hdrNits
So in a dark room, the Envy stays close to my reference setting. As the room gets brighter, the hdrNits target drops and the HDR image becomes progressively brighter to compensate for the ambient light. Everything between those points is interpolated and then rounded to 25-nit steps. Dampening logic ensures changes are smooth.
There is a separate rule for SDR. Since the Envy’s hdrNits setting has no effect on SDR, SDR content in a dim room drops the NovaStar LED drive to 50%. HDR content, or SDR viewed in brighter ambient light, runs the wall at 100%.
The result is that I basically stopped touching the brightness control. At night, the wall gradually settles back toward my reference HDR setting and lower SDR LED output. During the day, opening the blinds causes the system to progressively increase the perceived brightness so the image still holds up against the room.
Conceptually it is similar to what Dolby Vision IQ or HDR10+ Adaptive does on a television, except the ambient-light logic is running in Home Assistant, the tone mapper is external, and I control the curve myself.
THE NEW REMOTE
View attachment 11295
The other big change is the remote. I’m now using a Sanytron Astrion HA100, a small Android-based touchscreen remote that integrates with Home Assistant.
I liked the hardware, but the stock software was too limiting for what I wanted to do. The interface was restricted to a fixed set of card types, and the physical buttons were particularly frustrating: they could either behave as global navigation controls or perform page-specific actions, but not both. So I replaced the stock remote software with a Kotlin/Compose app. It’s open source here:
github.com/marcusadolfsson/astrion-custom
The home screen gives me direct access to the things I use most: activity selection, the Dim / Normal / Bright / Auto brightness modes described above, shades, climate, and the rest of the room controls. The VOICE button is probably my favorite part. Holding it streams audio from the remote’s microphone to Home Assistant, which decides where to send it based on the current activity.
For Apple TV, the audio is routed to Siri, so the remote effectively regains the Siri functionality I lost when I stopped using the Apple TV remote.
For Kaleidescape, the same button becomes a voice movie search. I can say the name of a movie, ask for movies by a particular director, or even describe a movie I can’t remember the name of. Home Assistant searches my actual Kaleidescape library and can start the matching title.
Being able to say something like “the one where the president fights terrorists on a plane” and have Air Force One start playing is probably my favorite trick in the house.
I also added a volume/mute OSD directly to the remote. Pressing a volume button gives immediate visual feedback in your hand rather than requiring an overlay on a 190-inch screen.
The end result is that the Astrion hardware is basically just the front end now. Home Assistant provides the state and configuration, while the custom app handles the UI, physical buttons, microphone, and feedback. That gives me one remote that can control the entire room without requiring anyone using it to know what’s happening behind the scenes.
That is an amazing setup. I think I am going to order that same remote. Is there a good place to learn more about the custom setup you did on it?
madolfsson
Active member
Here is my GitHub repo with information on how to install and customize it GitHub - marcusadolfsson/astrion-custom.
I use Claude Code for all my Home Assistant coding these days. It also wrote the custom app on the remote (with much guidance). If you never used Claude with HA, here is a good starting point astrion-custom/USING-CLAUDE-CODE-WITH-HOME-ASSISTANT.md at main · marcusadolfsson/astrion-custom
I use Claude Code for all my Home Assistant coding these days. It also wrote the custom app on the remote (with much guidance). If you never used Claude with HA, here is a good starting point astrion-custom/USING-CLAUDE-CODE-WITH-HOME-ASSISTANT.md at main · marcusadolfsson/astrion-custom
JonProphet
Well-known member
Well done and great write up. Someone told me that videowalls were the next big thing and while I'm sure they will leak into the consumer market, I think they are a long way off from wide adoption by a few years. Your experience sounds fantastic but not many of us can drop that kind of coin on a display device.