


madolfsson
Active member
New member and recent Kaleidescape owner, but wanted to share my experience building out my 190" MicroLED wall since there is so little info out there.

For the last couple of years I've been fascinated by the MicroLED walls showing up everywhere: airports, broadcast studios, theme parks, and live events. Universal's Epic Universe in particular really sold me on where this technology is heading. Some of the LED-based effects they're doing are incredible.
The problem was pricing. Samsung's The Wall is beautiful, but the price is impossible to justify. AWALL has done a great job lowering the entry cost. Earlier this year I started wondering if I could skip the middleman and buy directly from a manufacturer in China. So that's exactly what I did.
A little background first
Back in 2007 I built a house with a dedicated home theater. It was a proper man cave with sound isolation, specialty drywall, the works. You could crank it up and not worry about the rest of the house. During the 3D craze I ran Runco D-73d dual 1080p projectors with anamorphic lenses, one projector for each eye with passive glasses. Watching normal 2D content, both projectors displayed the same image. It was an awesome setup for its time.
Later I moved and ended up with a 4K ultra-short-throw projector and retractable screen in the living room. It was fine for movie nights, but daytime viewing wasn't great, and it never really gave me the same experience.
Earlier this year I moved into a condo. Like a lot of condos, there simply isn't room for a dedicated theater. On top of that, my living room has floor-to-ceiling glass on two sides. Great views. Terrible projector environment. So it was time to give MicroLED a try.
What I Bought
I ordered a Canbest DM-COB Series wall directly from China. This wasn't a situation where I spent months comparing every manufacturer on earth - there simply isn't a lot of content out there comparing them. Canbest seemed legitimate, had exhibited in the US at trade shows, and offered a COB product at a price point where the experiment felt worthwhile.
The first decision, which drives everything else, is how big do you want to go and how close do you want to sit?
 A wall is made up of multiple cabinets. Each cabinet measures 600 × 337.5 mm (23.6" × 13.3") in a 16:9 aspect ratio. You can configure these cabinets in any layout you want depending on the height and width you're after, but I kept the overall wall 16:9 (more on that later).
Next I needed to decide pixel pitch. The cabinets are available in P0.7, P0.9, P1.25, and P1.56. Pixel pitch is simply the distance from the center of one LED to the center of the next, measured in millimeters (not, as I first thought, the gap between the pixels). Smaller numbers mean the LEDs are packed more tightly, resulting in higher resolution and higher prices.
A common LED-industry rule of thumb is that the minimum viewing distance in feet is roughly ten times the pixel pitch in millimeters. My sitting position is 11 ft away, so I picked a P0.9 cabinet, which contains 640 × 360 pixels across eight magnetically attached tiles.
Interestingly, I've found the wall more forgiving than that guideline suggests. Even standing four or five feet away, I have a hard time seeing individual pixels. What you do see that close are the individual tiles, but from a normal seating distance the image appears completely continuous.
For comparison, many concert and event walls are in the 2.6 to 4.8 mm range, and large outdoor stadium displays can be 6 to 16 mm or larger. Those look fantastic from a distance but would be unusable in a living room. You'd clearly see the individual pixels.
Initially I spec'd a 6×6 configuration, but after taping it up on the wall I decided I wanted more width and went with 7×7 cabinets. That results in a finished wall measuring roughly 13.8 ft wide by 7.7 ft tall. The final resolution is 4480 × 2520, just over 11.2 million pixels, so for better and worse it's higher resolution than UHD 4K.
Since each cabinet is 16:9, the overall 7×7 layout is 16:9 as well. I considered a Cinemascope layout (7×5 is 2.48:1, 7×6 is 2.08:1), but after dealing with anamorphic lenses in the past, I remembered all the little annoyances: closed captions and UI elements not always fitting inside the image area (platform-dependent), plus the wife-approval factor of managing aspect-ratio switching. And who doesn't want a BIGGER wall? So I stuck with 16:9.
The panels I received use ICND1069 driver ICs, dual NovaStar A10s Pro receiving cards, a 40-scan architecture, a 3840 Hz refresh rate, and are calibrated to 1070 nits. They're capable of 120 Hz, although due to processor and cabling limitations (more below) 60 Hz is my current max at 10-bit color depth.
Worth noting on formats: the wall is **HDR10 and HLG only**. There's no native Dolby Vision and no HDR10+. These are commercial LED processors, and dynamic-metadata HDR formats simply aren't supported. Any Dolby Vision content has to be converted upstream (that's the VRROOM's job, more below), and HDR10+ dynamic metadata is just ignored and treated as HDR10. For a living-room display in 2026 that's the one real format gap to go in with your eyes open about.
Cost
 Let's get the obvious question out of the way. All in, I'm at around $54,000, but I made some decisions that drove the price up significantly.
The display package itself came to approximately $40,752 delivered to Florida. That included the wall, brackets, spare modules, spare parts, shipping, customs, and final delivery. The actual display accounted for about $36k of that total.
Then add the NovaStar MX2000 Pro with three fiber converters ($12k), the HDFury VRROOM ($550), electrical work, cabling, and smart outlets.
Had I stayed at a P0.9 6×6 wall, still a massive 162" and native 4K, and stuck with 60 Hz instead of 120 Hz capability, my all-in cost would have been closer to $34,000. That's due to fewer panels (36 instead of 49) and the ability to use a simpler all-in-one processor architecture.
Installation
Before the wall even shipped, I used reference drawings from Canbest to create a full set of construction drawings showing the plywood backing, stud locations, bracket locations, outlet positions, and Ethernet pass-through locations.
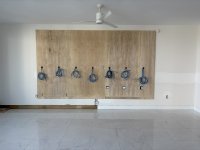
The wall sits on four sheets of furniture-grade plywood mounted directly through the drywall into the metal studs. The plywood is centered and cut to match the exact dimensions required by the Canbest mounting structure. I pre-planned seven Ethernet pass-through locations and three double-gang outlet locations so everything would line up with the bracket.
One thing I learned early is that power distribution on LED walls is very different from a normal television. Canbest recommended one 10-amp circuit per column (7 total), but for simplicity I ran four 20-amp circuits behind the wall. One is dedicated exclusively to the display. The other three tie into existing outlet and lighting circuits already in the room. I measured those circuits under full load and they were barely drawing about one amp each, so there was plenty of capacity without running new wires back to the panel. And as you'll see in the power section, the screen barely uses a single 20-amp circuit, so two would have been plenty.
To connect the cabinets to the processor, I pulled 25 Ethernet cables plus three spare runs before the wall went up. All runs terminate in an equipment rack where the MX2000 Pro, fiber converters, and source devices live. I didn't have enough space behind the cabinets to locate the fiber converters there. If I had, I could have saved some cabling.
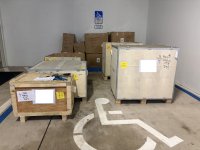
Once the plywood, electrical, and network wiring were complete, the actual installation was surprisingly straightforward. Unpacking the seven crates, assembling the brackets, mounting the structure, hanging the cabinets, and bringing the wall online took only about a day. Most of the project time went into planning and preparing the infrastructure beforehand.

Time lapse of us installing the screen
Calibration
One thing I didn't fully appreciate going in: a COB wall lives or dies on its factory calibration. Every LED module has slight variations in brightness and color from the manufacturing process, and left uncorrected, those variations are glaringly obvious. White fields look blotchy and uneven, with brightness all over the place from tile to tile.
Canbest shipped calibration coefficients with the wall, per-module correction data that the receiving cards apply to even out brightness and color across the entire surface. You don't really notice calibration when it's working, which is the point. But to see how much work it's doing, try turning it off: the difference is dramatic. With calibration disabled, white levels are immediately uneven across the wall and the seams between modules jump out. With it on, the surface reads as one continuous, uniform panel.
So if you go this route, make sure your manufacturer provides the calibration data (it's stored and loaded through the NovaStar software/receiving cards), and confirm it's actually loaded and enabled before you judge the image. A COB wall without its calibration coefficients will look broken, and it would be easy to mistake that for a defective panel when it's really just uncorrected raw modules.
Video Processor and Signal Chain
Although I'd never heard of them until this project, NovaStar is a leading manufacturer of video processors for LED walls.
COEX is NovaStar's newer ecosystem, and many people claim it produces a better image than the older H-Series processors, particularly when paired with A10s Pro receiving cards. Whether that's measurable I can't say. I don't have an H2 wall sitting next to mine for comparison. COEX does provide more flexibility around refresh-rate operation and frame-rate matching, which is particularly appealing in a home theater where a large percentage of content is still mastered at 24 fps.
Home-install walls aren't physically huge by commercial standards, but because of the small pitch you're pushing more pixels than many much larger event walls. And these processors aren't yet designed with home theater enthusiasts in mind.
My wall uses NovaStar's COEX 1G ecosystem (not the latest 5G system): an MX2000 Pro controller, dual A10s Pro receiving cards in every cabinet, and three CVT fiber converters distributing the signal throughout the wall.

NovaStar's current COEX 1G lineup has four controllers targeted at "smaller"-scale systems:
- **MX20 Pro**: roughly 3.9 million pixels, six Ethernet outputs (max 12 P0.9 cabinets at 10-bit/60 Hz)
- **MX30 Pro**: around 6.5 million pixels, ten outputs (max 20 P0.9 cabinets at 10-bit/60 Hz)
- **MX40 Pro**: probably the sweet spot for many home walls, roughly 9 million pixels and twenty Ethernet outputs (max 40 P0.9 cabinets at 10-bit/60 Hz)
- **MX2000 Pro**: a modular platform capable of driving more than 35 million pixels depending on the output cards installed
My wall is 4480 × 2520, just over 11.2 million pixels, which immediately eliminated the MX20, MX30, and MX40 on total loading capacity alone. Going from the all-in-one MX40 to the modular MX2000 roughly doubles the processor cost, so that's a real consideration for staying at 40 cabinets or fewer.
One other limitation to watch out for is the **Max Load Capacity per Ethernet Port**, the number of pixels each port on the processor can drive. It scales with frame rate and bit depth. For HDR 10-bit content:
- 24 Hz: 1,236,979 pixels
- 30 Hz: 989,583 pixels
- 60 Hz: 494,792 pixels
- 120 Hz: 247,396 pixels (for 8-bit: 329,861)
On my P0.9 display, each cabinet contains 230,400 pixels. With the COEX ecosystem and A10s Pro receiving cards, two cabinets (2 × 230,400 = 460,800) fit comfortably within the capacity of a single 1G output using a daisy chain while maintaining 10-bit HDR at 60 Hz. That's what allowed me to wire the wall with 25 active runs.
Moving to 120 Hz dramatically increases bandwidth requirements. In practical terms, each cabinet would need its own dedicated output path, which means my 49-cabinet wall would need 49 active outputs instead of 25. The MX2000 Pro can absolutely do that, but it would require additional output cards, additional fiber distribution hardware, and significantly more cabling. By the time you add all that up, the cost is hard to justify for a display that spends most of its time showing movies, streaming, sports, and live TV.
One nice thing about the design is that I haven't painted myself into a corner. The panels, receiving cards, and processor platform all support 120 Hz if I ever want it.
NovaStar's newest architecture is their 5G ecosystem, just starting to roll out. The basic idea is simple: instead of sending data over traditional 1G Ethernet, the newer system uses 5G transmission links with significantly higher bandwidth. For large walls the biggest benefit is a dramatic reduction in cabling, but it's still very pricey compared to the 1G senders and receivers.
The HDMI pipeline and audio
NovaStar equipment is commercial AV gear. It doesn't know what Dolby Vision is. It doesn't know what eARC is. It certainly wasn't designed around a Kaleidescape or Apple TV sitting in a living room.
The HDFury VRROOM bridges that gap by handling:
- eARC extraction
- EDID management
- LLDV (Low Latency Dolby Vision) to HDR10 conversion
- Four inputs, two independent video outputs, one eARC output
The important architectural constraint here is audio. The MX2000 is a video processor, HDMI in and wall out, and while it does have a SPDIF output, that's a dead end for a modern setup. SPDIF is a legacy link: it can carry stereo PCM or lossy 5.1, but it can't pass Dolby Atmos, TrueHD, or any lossless multichannel format, so it's not good enough for what I want out of the Sonos. There's no eARC or HDMI audio return on the NovaStar at all. That means the **only** viable way sound reaches my Sonos Arc is through the VRROOM's eARC output, so any source I want real audio from has to run through the VRROOM.
The Kaleidescape, Blu-ray, Switch, and one Apple TV all feed the VRROOM (MX2000 Inputs 1 and 2), with their audio extracted to the Arc via eARC. The other two or three Apple TVs connect directly to the MX2000 (Inputs 3 and 4) for live TV in multiview, but since nothing on the NovaStar has a usable audio path back, those direct Apple TVs are effectively video-only. The four MX2000 inputs let me build a multiview of any two sources, but the audio limitation is the real driver of what gets wired where.
The way I work around the silent direct Apple TVs is through automation rather than cabling. Those direct units are really just glanceable live-TV tiles in multiview, and I don't expect sound from them. When I actually want to *listen* to a channel, a Home Assistant script tunes that same channel in the Spectrum app on Apple TV 1, the unit routed through the VRROOM, so its audio comes through eARC to the Sonos. The script does it via deep link straight into the Spectrum app's channel tuning, so "move this channel to the one with sound" is a single action, not a re-cabling exercise. The direct Apple TVs stay as video-only multiview sources, and Apple TV 1 becomes the audible channel on demand. It's a good example of how much of this build came down to automating around the gear's commercial-AV limitations rather than fighting them.
HDR and Image Tuning
One thing worth flagging for anyone running HDR on an LED wall: out of the box, HDR content looks muted and dim compared to SDR. That surprised me, so I went down the HDR rabbit hole that many of you have already been down. Maybe I came to the right conclusions, maybe I didn't. I'm not chasing reference quality, I just wanted a punchy image that's watchable in daylight.
What I learned is that PQ is an absolute curve: it deliberately parks midtones low and reserves the top of the range for highlights mastered at 1000 to 4000 nits, brightness levels these walls can't reach. Rendered straight, that leaves the image well below the punch we get from SDR, which uses the full panel. On the NovaStar, the lever that worked for me is the HDR EOTF mode: switching to **ST2086 (linear)** and overriding **MaxCLL** well below the panel's real peak rescales the content proportionally into the wall's range and brings the midtones up. The gain is roughly panel-peak ÷ MaxCLL, so on a ~1070-nit wall a MaxCLL override around 300 gives about a 3.5× lift, and that's what finally makes HDR look as punchy as SDR. The tradeoff is real and worth stating: anything above your override value hard-clips, so you're trading some highlight detail on bright scenes (skies, snow) for SDR-like midtone brightness everywhere else. On the content most of us actually watch (interiors, night scenes, dramatic stuff) the clipping is invisible and the brightness gain is the whole ballgame. Set it on a dark-room reference scene, then sanity-check a bright daylight clip to make sure you haven't pushed the override so low that highlights sheet to white.
Where the HDR signal comes from changes how that override behaves. A Dolby Vision source converted to LLDV (in my case the Kaleidescape through the VRROOM) does its own dynamic, per-scene tone mapping to a target you set, so once you've dialed in your MaxCLL override, it stays consistent across everything you watch. Every LLDV title arrives already normalized to the same target, so one override value just works.
Raw HDR10 is a different animal. It carries only static, whole-movie metadata, and the actual content brightness varies enormously from title to title regardless of what that metadata claims. A conservatively-graded HDR10 film and an aggressively-graded one respond completely differently to the same override: one looks right, the next clips or goes flat. So I created a few override presets (100, 200, 300, 400, 500, Off) that I can pick from on demand. Expect to live with a compromise setting for HDR10, or accept that the occasional title needs a nudge, while your LLDV sources stay set-and-forget.
The best real fix is probably to add a dedicated processor for dynamic tone mapping, such as a Lumagen or madVR. Here's the subtlety, since it confused me at first: LLDV *is* doing dynamic tone mapping, but it maps to *reference* brightness, which on our walls is exactly the dim image we're fighting. My static MaxCLL override is a scene-blind boost layered on top to push past reference into SDR-like punch. That boost works, but because it treats every scene the same, it clips the bright scenes LLDV had carefully rolled off, so I'm trading the per-scene intelligence back out to buy brightness. A dedicated DTM processor replaces both stages at once: it reads each scene's actual content and maps it to your preferred, brighter-than-reference look dynamically, so you get the punch *without* the static clipping, and it does the same for raw HDR10, analyzing real frame data instead of trusting the unreliable static metadata. For a wall where you've accepted a clipping tradeoff to get watchable brightness, that's the upgrade path. It's not cheap (Lumagen's entry Radiance Pro is around $5,500 to start), but it's the difference between a single compromise setting and correct, automatic per-scene mapping across every source.
Power Consumption
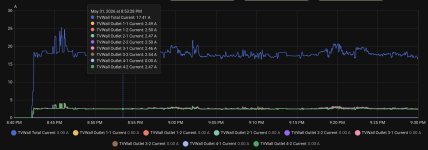
I monitor the wall and processor continuously using TP-Link Tapo Matter-enabled in-wall outlets with energy monitoring. Normal viewing sits somewhere around 17 to 20 amps total, roughly 2 to 2.4 kW. Startup peaks can briefly hit 24 to 25 amps, about 3 kW. The 80 amps I have available (across 4 × 20 A circuits) is plenty, and the load distribution ended up pretty even across the different sections of the wall.
The rack equipment is comparatively tiny: the MX2000 Pro draws about 0.6 amps, and the three CVTs combined about 0.62 amps.
Heat output is also lower than most people expect. You can feel it standing next to the wall, but it doesn't noticeably affect room comfort.
Making It Family Friendly
Out of the box, this stuff is still not designed for residential use. It's built for airports, stadiums, and broadcast environments. There's no power button. There's no startup animation. There's no user experience.
So I built a fair amount of Home Assistant automation around it. When someone wakes up an Apple TV, Home Assistant detects it and automatically powers the wall, the fiber converters, and the rest of the equipment chain. About fifteen seconds later, everything is ready to go.
The MX2000 itself stays powered continuously. The three CVTs and the wall outlets run through a Kasa smart plug, controlled automatically by Home Assistant.
Because there's no visual indication that the wall is booting, I installed an addressable LED strip underneath the Sonos Arc that runs a startup animation while everything powers up. It's a small detail, but it makes the system feel much more polished.
The wall can be controlled through a Sofabaton remote, Apple TV remote, Pixel Tablet, or Home Assistant dashboards. The goal was simple: nobody in my family should need to understand how an LED wall works.
Audio
The audio side is admittedly less ambitious than the display side. Right now I'm running a Sonos Arc, dual Era 300 surrounds, and a Sonos Sub.
Does that match a 190-inch MicroLED wall? Probably not. The reality is that I live in a condo, and there are practical limits to how much audio horsepower you can justify when you share walls with other people.
For what it is, the Sonos system does a surprisingly good job. Atmos content is immersive, everything integrates cleanly, and my wife doesn't have to stare at speaker towers scattered around the living room. Sometimes the best system isn't the theoretically perfect one. It's the one that fits the room and gets used every day.
Picture Quality

This is the part everybody wants to know about. From my sofa, roughly 11 feet away, I can't see pixel structure at all, and even standing four or five feet away I have a hard time picking out individual pixels. The immersion is exactly what I was after: at 11 feet, a 13.8-foot-wide wall fills your field of view in the best way. It's amazing. The image wraps far enough into your peripheral vision that you stop thinking about the edges.
The bigger visible challenge is panel alignment. If one panel sits even a millimeter proud of its neighbor, you can occasionally catch it under certain lighting. Once you're eight or nine feet away those issues disappear, especially viewing straight-on. At extreme angles, like from my kitchen, roughly 45 to 50 degrees off-axis, you can see panel boundaries more, depending on ambient light.
On reflections: the wall surface itself does pick up some ambient light from all that floor-to-ceiling glass, and on a fully black screen you'd notice it. But in practice the sheer brightness of the wall overpowers the reflections during actual viewing. That's the whole advantage of ~1070 nits in a bright room, and it's exactly why an LED wall works here where a projector never could. Sitting down to watch a movie? No reflection problem. You're just looking at a giant bright image that works in broad daylight. The best description I can come up with is this: imagine a 190-inch OLED that doesn't care whether it's noon or midnight.

At 190", low bandwidth content shows the compression issues. Obviously here is were Kaleidescape shines - I which there was an equivalent service for streaming channels! Local channels feeds look surprisingly rough stretched across a display this size. My next addition will probably be an ATSC tuner. Over-the-air broadcasts generally look noticeably better than the heavily compressed versions carried by streaming and cable providers.
Final Thoughts
Would I do it again? Without hesitation. The wall does exactly what I hoped: a giant, genuinely bright image that works at noon with the blinds open, something no projector was ever going to do in a glass-walled condo. The immersion at 11 feet is the real payoff, and it's the thing photos never quite capture.
A few honest takeaways if you're considering this:
The display is the easy part; the infrastructure is the project. The TV wall went up in about a day. Everything else (construction drawings, plywood backing, power, 25+ Ethernet runs, the rack, the automation) was weeks of planning, especially since it was my first time. Budget your time accordingly, and do the planning before anything ships.
Buying direct from China is viable, but you're the integrator. There's no dealer holding your hand. You're responsible for the processor choice, the signal chain, the audio workaround, the HDR tuning, and the family-friendly layer. If that sounds like a fun puzzle rather than a chore, you'll be fine. If it doesn't, pay a vendor like AWALL for the support. It's worth it.
These are commercial processors in a living room, and it shows. No power button, no eARC, no Dolby Vision, no user experience. Almost every "rough edge" in this build came down to bridging commercial AV gear into a residential setup: the VRROOM for audio and LLDV, Home Assistant for power and channel routing, an LED strip for a boot indicator. Going in expecting to *build* the consumer experience yourself, rather than expecting the gear to provide it, is the right mindset.
Match the spend to how you actually watch. My jump from a 6×6/60 Hz wall (~$34k) to a 7×7/120 Hz-capable wall (~$54k) was driven by wanting more width and future headroom, not by anything I needed for movies, streaming, and sports. If I'd been ruthless about it, the cheaper config would have served 95% of my viewing. Decide where you land on that before you spec it.
If you're on the fence: it's a lot of money and a lot of planning, but it's the first display I've owned that makes people stop talking when they walk into the room. Happy to answer questions on any of it.
For the last couple of years I've been fascinated by the MicroLED walls showing up everywhere: airports, broadcast studios, theme parks, and live events. Universal's Epic Universe in particular really sold me on where this technology is heading. Some of the LED-based effects they're doing are incredible.
The problem was pricing. Samsung's The Wall is beautiful, but the price is impossible to justify. AWALL has done a great job lowering the entry cost. Earlier this year I started wondering if I could skip the middleman and buy directly from a manufacturer in China. So that's exactly what I did.
A little background first
Back in 2007 I built a house with a dedicated home theater. It was a proper man cave with sound isolation, specialty drywall, the works. You could crank it up and not worry about the rest of the house. During the 3D craze I ran Runco D-73d dual 1080p projectors with anamorphic lenses, one projector for each eye with passive glasses. Watching normal 2D content, both projectors displayed the same image. It was an awesome setup for its time.
Later I moved and ended up with a 4K ultra-short-throw projector and retractable screen in the living room. It was fine for movie nights, but daytime viewing wasn't great, and it never really gave me the same experience.
Earlier this year I moved into a condo. Like a lot of condos, there simply isn't room for a dedicated theater. On top of that, my living room has floor-to-ceiling glass on two sides. Great views. Terrible projector environment. So it was time to give MicroLED a try.
What I Bought
I ordered a Canbest DM-COB Series wall directly from China. This wasn't a situation where I spent months comparing every manufacturer on earth - there simply isn't a lot of content out there comparing them. Canbest seemed legitimate, had exhibited in the US at trade shows, and offered a COB product at a price point where the experiment felt worthwhile.
The first decision, which drives everything else, is how big do you want to go and how close do you want to sit?
A wall is made up of multiple cabinets. Each cabinet measures 600 × 337.5 mm (23.6" × 13.3") in a 16:9 aspect ratio. You can configure these cabinets in any layout you want depending on the height and width you're after, but I kept the overall wall 16:9 (more on that later).Next I needed to decide pixel pitch. The cabinets are available in P0.7, P0.9, P1.25, and P1.56. Pixel pitch is simply the distance from the center of one LED to the center of the next, measured in millimeters (not, as I first thought, the gap between the pixels). Smaller numbers mean the LEDs are packed more tightly, resulting in higher resolution and higher prices.
A common LED-industry rule of thumb is that the minimum viewing distance in feet is roughly ten times the pixel pitch in millimeters. My sitting position is 11 ft away, so I picked a P0.9 cabinet, which contains 640 × 360 pixels across eight magnetically attached tiles.
Interestingly, I've found the wall more forgiving than that guideline suggests. Even standing four or five feet away, I have a hard time seeing individual pixels. What you do see that close are the individual tiles, but from a normal seating distance the image appears completely continuous.
For comparison, many concert and event walls are in the 2.6 to 4.8 mm range, and large outdoor stadium displays can be 6 to 16 mm or larger. Those look fantastic from a distance but would be unusable in a living room. You'd clearly see the individual pixels.
Initially I spec'd a 6×6 configuration, but after taping it up on the wall I decided I wanted more width and went with 7×7 cabinets. That results in a finished wall measuring roughly 13.8 ft wide by 7.7 ft tall. The final resolution is 4480 × 2520, just over 11.2 million pixels, so for better and worse it's higher resolution than UHD 4K.
Since each cabinet is 16:9, the overall 7×7 layout is 16:9 as well. I considered a Cinemascope layout (7×5 is 2.48:1, 7×6 is 2.08:1), but after dealing with anamorphic lenses in the past, I remembered all the little annoyances: closed captions and UI elements not always fitting inside the image area (platform-dependent), plus the wife-approval factor of managing aspect-ratio switching. And who doesn't want a BIGGER wall? So I stuck with 16:9.
The panels I received use ICND1069 driver ICs, dual NovaStar A10s Pro receiving cards, a 40-scan architecture, a 3840 Hz refresh rate, and are calibrated to 1070 nits. They're capable of 120 Hz, although due to processor and cabling limitations (more below) 60 Hz is my current max at 10-bit color depth.
Worth noting on formats: the wall is **HDR10 and HLG only**. There's no native Dolby Vision and no HDR10+. These are commercial LED processors, and dynamic-metadata HDR formats simply aren't supported. Any Dolby Vision content has to be converted upstream (that's the VRROOM's job, more below), and HDR10+ dynamic metadata is just ignored and treated as HDR10. For a living-room display in 2026 that's the one real format gap to go in with your eyes open about.
Cost
Let's get the obvious question out of the way. All in, I'm at around $54,000, but I made some decisions that drove the price up significantly.The display package itself came to approximately $40,752 delivered to Florida. That included the wall, brackets, spare modules, spare parts, shipping, customs, and final delivery. The actual display accounted for about $36k of that total.
Then add the NovaStar MX2000 Pro with three fiber converters ($12k), the HDFury VRROOM ($550), electrical work, cabling, and smart outlets.
Had I stayed at a P0.9 6×6 wall, still a massive 162" and native 4K, and stuck with 60 Hz instead of 120 Hz capability, my all-in cost would have been closer to $34,000. That's due to fewer panels (36 instead of 49) and the ability to use a simpler all-in-one processor architecture.
Installation
Before the wall even shipped, I used reference drawings from Canbest to create a full set of construction drawings showing the plywood backing, stud locations, bracket locations, outlet positions, and Ethernet pass-through locations.
The wall sits on four sheets of furniture-grade plywood mounted directly through the drywall into the metal studs. The plywood is centered and cut to match the exact dimensions required by the Canbest mounting structure. I pre-planned seven Ethernet pass-through locations and three double-gang outlet locations so everything would line up with the bracket.
One thing I learned early is that power distribution on LED walls is very different from a normal television. Canbest recommended one 10-amp circuit per column (7 total), but for simplicity I ran four 20-amp circuits behind the wall. One is dedicated exclusively to the display. The other three tie into existing outlet and lighting circuits already in the room. I measured those circuits under full load and they were barely drawing about one amp each, so there was plenty of capacity without running new wires back to the panel. And as you'll see in the power section, the screen barely uses a single 20-amp circuit, so two would have been plenty.
To connect the cabinets to the processor, I pulled 25 Ethernet cables plus three spare runs before the wall went up. All runs terminate in an equipment rack where the MX2000 Pro, fiber converters, and source devices live. I didn't have enough space behind the cabinets to locate the fiber converters there. If I had, I could have saved some cabling.
Once the plywood, electrical, and network wiring were complete, the actual installation was surprisingly straightforward. Unpacking the seven crates, assembling the brackets, mounting the structure, hanging the cabinets, and bringing the wall online took only about a day. Most of the project time went into planning and preparing the infrastructure beforehand.
Time lapse of us installing the screen
Calibration
One thing I didn't fully appreciate going in: a COB wall lives or dies on its factory calibration. Every LED module has slight variations in brightness and color from the manufacturing process, and left uncorrected, those variations are glaringly obvious. White fields look blotchy and uneven, with brightness all over the place from tile to tile.
Canbest shipped calibration coefficients with the wall, per-module correction data that the receiving cards apply to even out brightness and color across the entire surface. You don't really notice calibration when it's working, which is the point. But to see how much work it's doing, try turning it off: the difference is dramatic. With calibration disabled, white levels are immediately uneven across the wall and the seams between modules jump out. With it on, the surface reads as one continuous, uniform panel.
So if you go this route, make sure your manufacturer provides the calibration data (it's stored and loaded through the NovaStar software/receiving cards), and confirm it's actually loaded and enabled before you judge the image. A COB wall without its calibration coefficients will look broken, and it would be easy to mistake that for a defective panel when it's really just uncorrected raw modules.
Video Processor and Signal Chain
Although I'd never heard of them until this project, NovaStar is a leading manufacturer of video processors for LED walls.
COEX is NovaStar's newer ecosystem, and many people claim it produces a better image than the older H-Series processors, particularly when paired with A10s Pro receiving cards. Whether that's measurable I can't say. I don't have an H2 wall sitting next to mine for comparison. COEX does provide more flexibility around refresh-rate operation and frame-rate matching, which is particularly appealing in a home theater where a large percentage of content is still mastered at 24 fps.
Home-install walls aren't physically huge by commercial standards, but because of the small pitch you're pushing more pixels than many much larger event walls. And these processors aren't yet designed with home theater enthusiasts in mind.
My wall uses NovaStar's COEX 1G ecosystem (not the latest 5G system): an MX2000 Pro controller, dual A10s Pro receiving cards in every cabinet, and three CVT fiber converters distributing the signal throughout the wall.
NovaStar's current COEX 1G lineup has four controllers targeted at "smaller"-scale systems:
- **MX20 Pro**: roughly 3.9 million pixels, six Ethernet outputs (max 12 P0.9 cabinets at 10-bit/60 Hz)
- **MX30 Pro**: around 6.5 million pixels, ten outputs (max 20 P0.9 cabinets at 10-bit/60 Hz)
- **MX40 Pro**: probably the sweet spot for many home walls, roughly 9 million pixels and twenty Ethernet outputs (max 40 P0.9 cabinets at 10-bit/60 Hz)
- **MX2000 Pro**: a modular platform capable of driving more than 35 million pixels depending on the output cards installed
My wall is 4480 × 2520, just over 11.2 million pixels, which immediately eliminated the MX20, MX30, and MX40 on total loading capacity alone. Going from the all-in-one MX40 to the modular MX2000 roughly doubles the processor cost, so that's a real consideration for staying at 40 cabinets or fewer.
One other limitation to watch out for is the **Max Load Capacity per Ethernet Port**, the number of pixels each port on the processor can drive. It scales with frame rate and bit depth. For HDR 10-bit content:
- 24 Hz: 1,236,979 pixels
- 30 Hz: 989,583 pixels
- 60 Hz: 494,792 pixels
- 120 Hz: 247,396 pixels (for 8-bit: 329,861)
On my P0.9 display, each cabinet contains 230,400 pixels. With the COEX ecosystem and A10s Pro receiving cards, two cabinets (2 × 230,400 = 460,800) fit comfortably within the capacity of a single 1G output using a daisy chain while maintaining 10-bit HDR at 60 Hz. That's what allowed me to wire the wall with 25 active runs.
Moving to 120 Hz dramatically increases bandwidth requirements. In practical terms, each cabinet would need its own dedicated output path, which means my 49-cabinet wall would need 49 active outputs instead of 25. The MX2000 Pro can absolutely do that, but it would require additional output cards, additional fiber distribution hardware, and significantly more cabling. By the time you add all that up, the cost is hard to justify for a display that spends most of its time showing movies, streaming, sports, and live TV.
One nice thing about the design is that I haven't painted myself into a corner. The panels, receiving cards, and processor platform all support 120 Hz if I ever want it.
NovaStar's newest architecture is their 5G ecosystem, just starting to roll out. The basic idea is simple: instead of sending data over traditional 1G Ethernet, the newer system uses 5G transmission links with significantly higher bandwidth. For large walls the biggest benefit is a dramatic reduction in cabling, but it's still very pricey compared to the 1G senders and receivers.
The HDMI pipeline and audio
NovaStar equipment is commercial AV gear. It doesn't know what Dolby Vision is. It doesn't know what eARC is. It certainly wasn't designed around a Kaleidescape or Apple TV sitting in a living room.
The HDFury VRROOM bridges that gap by handling:
- eARC extraction
- EDID management
- LLDV (Low Latency Dolby Vision) to HDR10 conversion
- Four inputs, two independent video outputs, one eARC output
The important architectural constraint here is audio. The MX2000 is a video processor, HDMI in and wall out, and while it does have a SPDIF output, that's a dead end for a modern setup. SPDIF is a legacy link: it can carry stereo PCM or lossy 5.1, but it can't pass Dolby Atmos, TrueHD, or any lossless multichannel format, so it's not good enough for what I want out of the Sonos. There's no eARC or HDMI audio return on the NovaStar at all. That means the **only** viable way sound reaches my Sonos Arc is through the VRROOM's eARC output, so any source I want real audio from has to run through the VRROOM.
The Kaleidescape, Blu-ray, Switch, and one Apple TV all feed the VRROOM (MX2000 Inputs 1 and 2), with their audio extracted to the Arc via eARC. The other two or three Apple TVs connect directly to the MX2000 (Inputs 3 and 4) for live TV in multiview, but since nothing on the NovaStar has a usable audio path back, those direct Apple TVs are effectively video-only. The four MX2000 inputs let me build a multiview of any two sources, but the audio limitation is the real driver of what gets wired where.
The way I work around the silent direct Apple TVs is through automation rather than cabling. Those direct units are really just glanceable live-TV tiles in multiview, and I don't expect sound from them. When I actually want to *listen* to a channel, a Home Assistant script tunes that same channel in the Spectrum app on Apple TV 1, the unit routed through the VRROOM, so its audio comes through eARC to the Sonos. The script does it via deep link straight into the Spectrum app's channel tuning, so "move this channel to the one with sound" is a single action, not a re-cabling exercise. The direct Apple TVs stay as video-only multiview sources, and Apple TV 1 becomes the audible channel on demand. It's a good example of how much of this build came down to automating around the gear's commercial-AV limitations rather than fighting them.
HDR and Image Tuning
One thing worth flagging for anyone running HDR on an LED wall: out of the box, HDR content looks muted and dim compared to SDR. That surprised me, so I went down the HDR rabbit hole that many of you have already been down. Maybe I came to the right conclusions, maybe I didn't. I'm not chasing reference quality, I just wanted a punchy image that's watchable in daylight.
What I learned is that PQ is an absolute curve: it deliberately parks midtones low and reserves the top of the range for highlights mastered at 1000 to 4000 nits, brightness levels these walls can't reach. Rendered straight, that leaves the image well below the punch we get from SDR, which uses the full panel. On the NovaStar, the lever that worked for me is the HDR EOTF mode: switching to **ST2086 (linear)** and overriding **MaxCLL** well below the panel's real peak rescales the content proportionally into the wall's range and brings the midtones up. The gain is roughly panel-peak ÷ MaxCLL, so on a ~1070-nit wall a MaxCLL override around 300 gives about a 3.5× lift, and that's what finally makes HDR look as punchy as SDR. The tradeoff is real and worth stating: anything above your override value hard-clips, so you're trading some highlight detail on bright scenes (skies, snow) for SDR-like midtone brightness everywhere else. On the content most of us actually watch (interiors, night scenes, dramatic stuff) the clipping is invisible and the brightness gain is the whole ballgame. Set it on a dark-room reference scene, then sanity-check a bright daylight clip to make sure you haven't pushed the override so low that highlights sheet to white.
Where the HDR signal comes from changes how that override behaves. A Dolby Vision source converted to LLDV (in my case the Kaleidescape through the VRROOM) does its own dynamic, per-scene tone mapping to a target you set, so once you've dialed in your MaxCLL override, it stays consistent across everything you watch. Every LLDV title arrives already normalized to the same target, so one override value just works.
Raw HDR10 is a different animal. It carries only static, whole-movie metadata, and the actual content brightness varies enormously from title to title regardless of what that metadata claims. A conservatively-graded HDR10 film and an aggressively-graded one respond completely differently to the same override: one looks right, the next clips or goes flat. So I created a few override presets (100, 200, 300, 400, 500, Off) that I can pick from on demand. Expect to live with a compromise setting for HDR10, or accept that the occasional title needs a nudge, while your LLDV sources stay set-and-forget.
The best real fix is probably to add a dedicated processor for dynamic tone mapping, such as a Lumagen or madVR. Here's the subtlety, since it confused me at first: LLDV *is* doing dynamic tone mapping, but it maps to *reference* brightness, which on our walls is exactly the dim image we're fighting. My static MaxCLL override is a scene-blind boost layered on top to push past reference into SDR-like punch. That boost works, but because it treats every scene the same, it clips the bright scenes LLDV had carefully rolled off, so I'm trading the per-scene intelligence back out to buy brightness. A dedicated DTM processor replaces both stages at once: it reads each scene's actual content and maps it to your preferred, brighter-than-reference look dynamically, so you get the punch *without* the static clipping, and it does the same for raw HDR10, analyzing real frame data instead of trusting the unreliable static metadata. For a wall where you've accepted a clipping tradeoff to get watchable brightness, that's the upgrade path. It's not cheap (Lumagen's entry Radiance Pro is around $5,500 to start), but it's the difference between a single compromise setting and correct, automatic per-scene mapping across every source.
Power Consumption
I monitor the wall and processor continuously using TP-Link Tapo Matter-enabled in-wall outlets with energy monitoring. Normal viewing sits somewhere around 17 to 20 amps total, roughly 2 to 2.4 kW. Startup peaks can briefly hit 24 to 25 amps, about 3 kW. The 80 amps I have available (across 4 × 20 A circuits) is plenty, and the load distribution ended up pretty even across the different sections of the wall.
The rack equipment is comparatively tiny: the MX2000 Pro draws about 0.6 amps, and the three CVTs combined about 0.62 amps.
Heat output is also lower than most people expect. You can feel it standing next to the wall, but it doesn't noticeably affect room comfort.
Making It Family Friendly
Out of the box, this stuff is still not designed for residential use. It's built for airports, stadiums, and broadcast environments. There's no power button. There's no startup animation. There's no user experience.
So I built a fair amount of Home Assistant automation around it. When someone wakes up an Apple TV, Home Assistant detects it and automatically powers the wall, the fiber converters, and the rest of the equipment chain. About fifteen seconds later, everything is ready to go.
The MX2000 itself stays powered continuously. The three CVTs and the wall outlets run through a Kasa smart plug, controlled automatically by Home Assistant.
Because there's no visual indication that the wall is booting, I installed an addressable LED strip underneath the Sonos Arc that runs a startup animation while everything powers up. It's a small detail, but it makes the system feel much more polished.
The wall can be controlled through a Sofabaton remote, Apple TV remote, Pixel Tablet, or Home Assistant dashboards. The goal was simple: nobody in my family should need to understand how an LED wall works.
Audio
The audio side is admittedly less ambitious than the display side. Right now I'm running a Sonos Arc, dual Era 300 surrounds, and a Sonos Sub.
Does that match a 190-inch MicroLED wall? Probably not. The reality is that I live in a condo, and there are practical limits to how much audio horsepower you can justify when you share walls with other people.
For what it is, the Sonos system does a surprisingly good job. Atmos content is immersive, everything integrates cleanly, and my wife doesn't have to stare at speaker towers scattered around the living room. Sometimes the best system isn't the theoretically perfect one. It's the one that fits the room and gets used every day.
Picture Quality
This is the part everybody wants to know about. From my sofa, roughly 11 feet away, I can't see pixel structure at all, and even standing four or five feet away I have a hard time picking out individual pixels. The immersion is exactly what I was after: at 11 feet, a 13.8-foot-wide wall fills your field of view in the best way. It's amazing. The image wraps far enough into your peripheral vision that you stop thinking about the edges.
The bigger visible challenge is panel alignment. If one panel sits even a millimeter proud of its neighbor, you can occasionally catch it under certain lighting. Once you're eight or nine feet away those issues disappear, especially viewing straight-on. At extreme angles, like from my kitchen, roughly 45 to 50 degrees off-axis, you can see panel boundaries more, depending on ambient light.
On reflections: the wall surface itself does pick up some ambient light from all that floor-to-ceiling glass, and on a fully black screen you'd notice it. But in practice the sheer brightness of the wall overpowers the reflections during actual viewing. That's the whole advantage of ~1070 nits in a bright room, and it's exactly why an LED wall works here where a projector never could. Sitting down to watch a movie? No reflection problem. You're just looking at a giant bright image that works in broad daylight. The best description I can come up with is this: imagine a 190-inch OLED that doesn't care whether it's noon or midnight.
At 190", low bandwidth content shows the compression issues. Obviously here is were Kaleidescape shines - I which there was an equivalent service for streaming channels! Local channels feeds look surprisingly rough stretched across a display this size. My next addition will probably be an ATSC tuner. Over-the-air broadcasts generally look noticeably better than the heavily compressed versions carried by streaming and cable providers.
Final Thoughts
Would I do it again? Without hesitation. The wall does exactly what I hoped: a giant, genuinely bright image that works at noon with the blinds open, something no projector was ever going to do in a glass-walled condo. The immersion at 11 feet is the real payoff, and it's the thing photos never quite capture.
A few honest takeaways if you're considering this:
The display is the easy part; the infrastructure is the project. The TV wall went up in about a day. Everything else (construction drawings, plywood backing, power, 25+ Ethernet runs, the rack, the automation) was weeks of planning, especially since it was my first time. Budget your time accordingly, and do the planning before anything ships.
Buying direct from China is viable, but you're the integrator. There's no dealer holding your hand. You're responsible for the processor choice, the signal chain, the audio workaround, the HDR tuning, and the family-friendly layer. If that sounds like a fun puzzle rather than a chore, you'll be fine. If it doesn't, pay a vendor like AWALL for the support. It's worth it.
These are commercial processors in a living room, and it shows. No power button, no eARC, no Dolby Vision, no user experience. Almost every "rough edge" in this build came down to bridging commercial AV gear into a residential setup: the VRROOM for audio and LLDV, Home Assistant for power and channel routing, an LED strip for a boot indicator. Going in expecting to *build* the consumer experience yourself, rather than expecting the gear to provide it, is the right mindset.
Match the spend to how you actually watch. My jump from a 6×6/60 Hz wall (~$34k) to a 7×7/120 Hz-capable wall (~$54k) was driven by wanting more width and future headroom, not by anything I needed for movies, streaming, and sports. If I'd been ruthless about it, the cheaper config would have served 95% of my viewing. Decide where you land on that before you spec it.
If you're on the fence: it's a lot of money and a lot of planning, but it's the first display I've owned that makes people stop talking when they walk into the room. Happy to answer questions on any of it.





 On paper...maybe...but not from a immersion and "feels like a theater" pov.